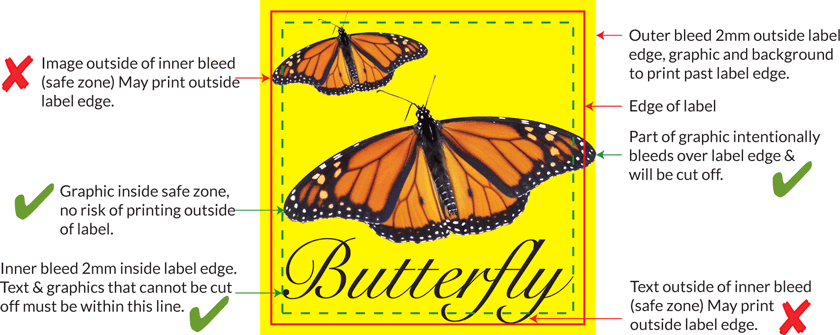
At Sticker.com.au, we want you to be proud of your new stickers, so we try to make the artwork process as easy as possible for you. There are two ways to get the design you want:
- Take advantage of our Artwork service: One of our professional designers can put together a great-looking sticker based on your instructions and submit it to you for your approval. You can tell us your instructions when you order. Our artwork service is quick and efficient.
- Or, you can submit your own artwork or graphics to us, and we’ll get your design print-ready, then show it to you for your approval.
Here's a list of guidelines to help you submit your artwork. If you have any questions, please contact us.
Artwork
- For a quality print, we require no less than 300dpi.

We take no responsibility for lesser quality due to low resolution files supplied.
- Artwork should be CMYK as RGB files will print discoloured.
- We require 2mm bleed all around. This means that anything touching the trim edge of your artwork requires bleed over the edge of your artwork by 2mm. We also recommend you keep a clean area of 2mm inside from the trim edge to be sure that nothing important will be lost during the print process.
- Label artwork with bleed

- Artwork that requires bleed needs to be checked to make sure that the label allows for bleed. Refer to die drawings for red & green label edges (for labels on A4 sheets).
- All fonts must be outlined, and additional files embedded to retain the look of your artwork.
- Only supply artwork one up. (Do not layup your files.)
- The formats you can supply your artwork in are: PDF, EPS, TIF, JPEG, Illustrator, Photoshop, InDesign. (Anything else may include an additional charge, please contact us about this.)
- If your job requires a specific colour, please quote PMS colour. (We do our best to colour match however, there are limitations depending on the print method.)
- Supply your file in it’s original/native format. (The program it was created in.)
- If your artwork is black, please use 100% black, and not four colour blacks.
- Please be aware compression settings may affect your print quality
- Flatten all transparency effects. If you don’t, although appearing fine on screen, there will be problems during the printing process.
Proofs
- As a policy, we do not print without a signed off proof.
- On request a printed proof can be supplied. (Unavailable in some print methods)
Tips
How To Convert Fonts To Outlines (Adobe Illustrator)
You can convert fonts to outlines in Illustrator by highlighting all text with the "Selection Tool" and selecting:
Type > Create Outlines. This will ensure all fonts in your artwork look correct at our end, and our software doesn't substitute your selected fonts.
How To Check the DPI of an Image (Adobe Photoshop)
You can check the DPI of an image in Photoshop by selecting:
Image > Image Size. It is recommended that you do not use any images straight off web pages, as they are low resolution (72 DPI) and will produce an inferior quality sticker (blurry & pixelated). TIF's are the recommended file format as they are higher quality and compatible with both Macs & PCs. We require 300 DPI.
How To Convert Images To CMYK Colour (Adobe Photoshop)
You can convert images to CMYK in Photoshop by selecting:
Image > Mode > CMYK Colour. This will ensure your final product colours look exactly like the file you sent us. Industry standard sticker printing is done in CMYK, (Representing the ink values Cyan, Magenta, Yellow & Black). RGB (Red, Green & Blue) mode represents the colours you see on a computer or TV screen.
Sending Proof for Approval
Please note: All proofs when viewed on different monitors will look different in colour due to different monitor calibrations. Printed proofs are digitally printed and not for colour matching.


